Graphic Organisers: An example of a "least intrusive" adjustment
Graphic organisers are one of the best examples of an adjustment that can be made for students with disabilities whilst also benefiting all other students in their class.
What is a Graphic organiser?
Graphic organisers are things like tables, diagrams, flow charts, checklists. They can be used to visually represent the link between ideas, or the steps in a process. You can find many examples of graphic organisers at teach-nology.com or education.oasis.com
How would you use a Graphic organiser?
Lesson plans:
Graphic organisers can be used as lesson plans to help children be organised and stay on track....
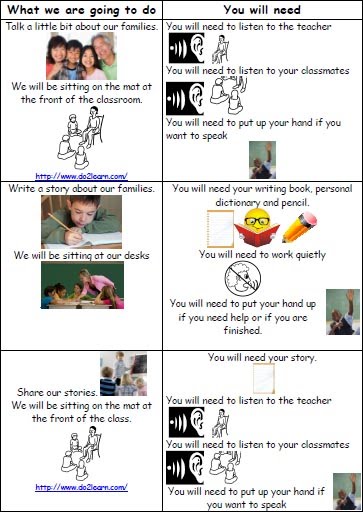
This would be important for a student who has attention and organisational difficulties such as ADHD, Autism, Down Syndrome, Bi-polar disorder and so on. However, something like this could be hung out the front of the room and used for the whole class as it could benefit all students.
Concept maps
These are very helpful to help children with recognising relevant vocabulary, as well as helping them to create links between ideas - which is an important process in learning and remembering things. They can be as simple or as complex as appropriate to the age of the child. They could also be made with pictures and words, or just pictures as well.

Writing and reading scaffolds
Graphic organisers are a great way to help children who struggle to organise their thoughts. It can help them write more coherent, longer stories or essays.
Giving a child who is struggling with literacy a story map before they read a story can also help them focus on the meaning of a story rather than just decoding the words on the page. Having a sense of how the story fits together. This will help them read more fluently as knowing what is going to happen gives children struggling with literacy a better chance of making correct "informed guesses" about any unfamiliar words on the page - a process we all use when reading, especially when we don't want to interrupt the flow of the story.
Story maps can be simple or complex. They can be used for children of all abilities, though you should never force children to use them as many children who are very creative, or gifted in story-writing, work best when they can just let the story flow from their pen. So the "least intrusive" use of story maps would be to use them in demonstrations and introduction to topics and stories, and then making them available for those who want to use them in their writing tasks.
For factual texts, KWL charts are a good way of activating interest and prior knowledge of a child. This can be very helpful for children with ADHD and Autism as it can help them become interested in the topic.
Simple or more complex main idea charts can help students organise their thoughts when they have to write assignments or essays on topics. These can be used in a similar way to story maps.
Instructions
We have probably all used checklists at one time or another. Checklists are another example of how graphic organisers can be used. Instructions can also be represented in a series of pictures - which is important for any child who is struggling to hear, remember or read instructions.
Rules for Using Graphic Organisers
Blaxendall (2003) discusses the benefits as well as the pitfalls of using graphic organisers. He suggests successful use of graphic organisers comes down to three things:
- Consistency: Regularly using the same set of organisers. This helps children get used to what each type of organiser is used for and what they symbolise.
- Coherence: Don't put any irrelevant information in an organiser - it is for important information only. Keep it simple.
- Creativity: Use them in as many situations as possible (classwork, homework, group work). Use pictures as much as possible, ensuring that they are age-appropriate and specifically relevant to the content of the organiser.
Reference:
Blaxendall, B. (2003). Consistent, Coherent, Creative: The 3 C's of Graphic Organisers. Teaching Exceptional Children, 35(3), p47.
. Read more...


